看了非常的多关于 Calico 的资料
Tigera. Advanced Kubernetes Networking with Project Calico
… 这是一篇 2017.10.* 的记录.
calico-node 容器
Felix 是核心, 负责 1. 生成 route 2. 生成 ACL 3. 响应来自 workloads 的 ARP (使用本机 mac 地址)
BIRD 是个开源的使用 BGP(http://bird.network.cz/ ) 分发 route 的 daemon
confd 监听 etcd 配置的变更, 负责重启服务
其中可以配置只运行 Felix, 而不跑 BIRD 和 confd. 这样就没有路由分发(BGP)和配置变更. 只有当前主机的路由.
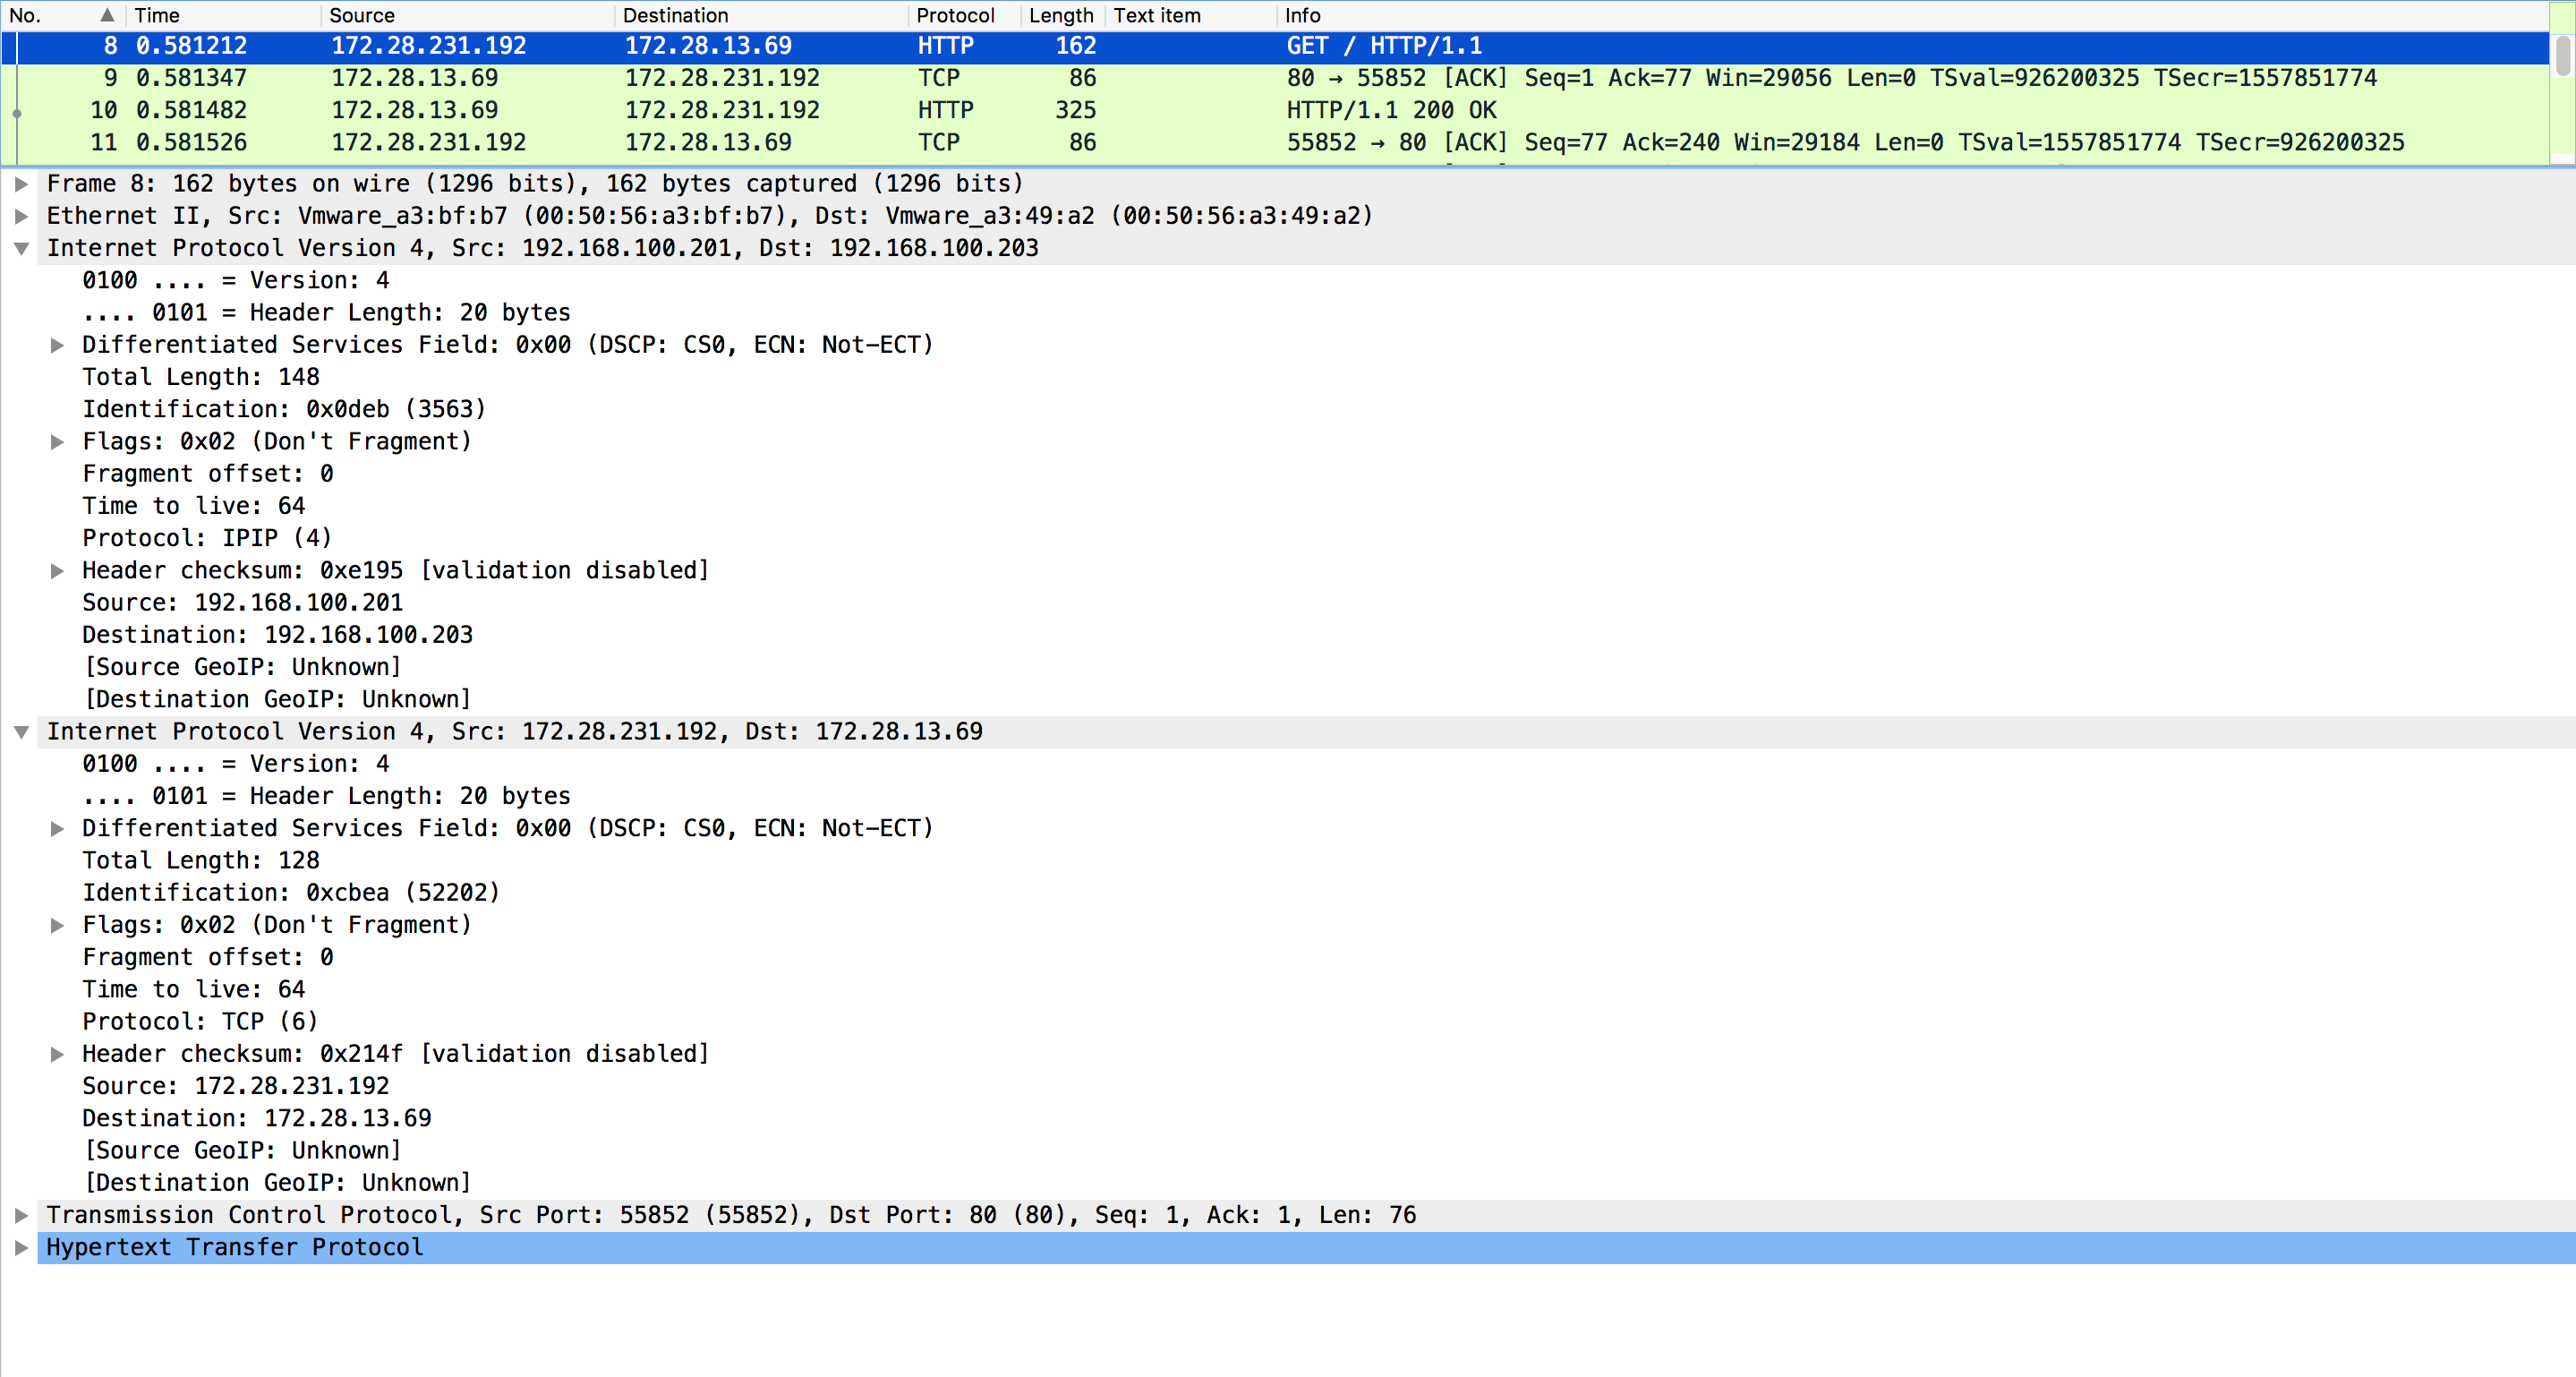
IP-in-IP calico 里面提到过很多 IP-in-IP 技术,
优势: This is often the case for public-cloud environments where you have limited control over the network, and in particular you have no option to set up BGP peering between your Calico nodes and the network routers.
https://docs.projectcalico.org/v2.2/usage/configuration/ip-in-ip
配置 IP-in-IP calico 1 2 3 4 5 6 7 8 9 10 11 calicoctl apply -f - << EOF apiVersion: v1 kind: ipPool metadata: cidr: 172.28.0.0/16 spec: ipip: enabled: true mode: always nat-outgoing: true EOF
抓包可以看到就是有两个 IP 头部:
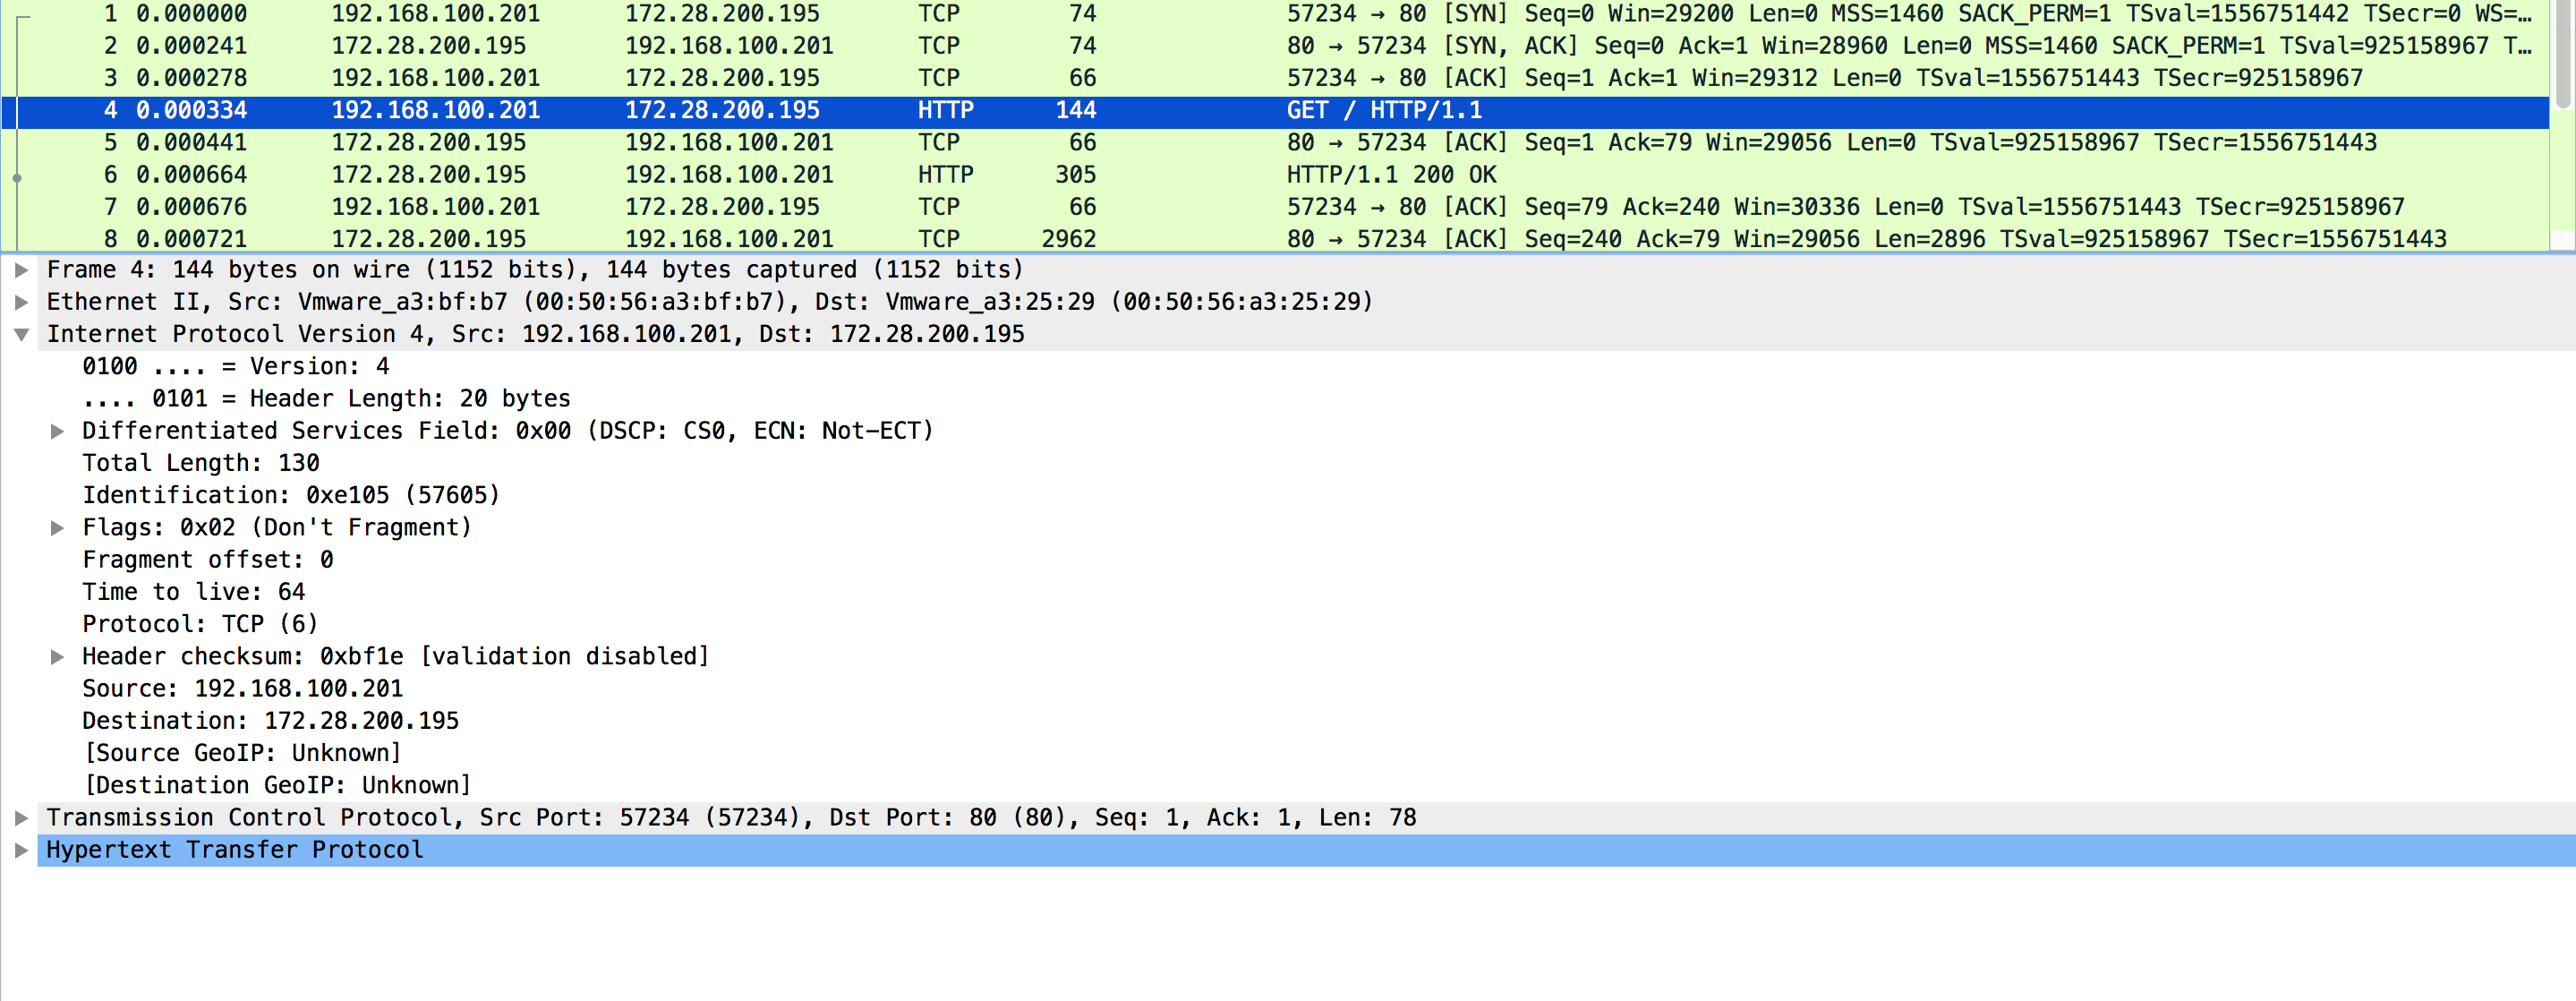
配置 cross-subnet Calico cross-subnet 的优势: This provides better performance in AWS multi-AZ deployments, and in general when deploying on networks where pools of nodes with L2 connectivity are connected via a router.
https://docs.projectcalico.org/v2.2/usage/configuration/ip-in-ip
就是直接请求的 podIP
两种配置下的主机路由 IP-in-IP 1 2 3 4 5 6 7 8 9 10 11 12 13 14 15 16 17 18 19 20 21 22 23 24 25 26 27 28 29 $ route -n ... 172.28.13.64 192.168.100.203 255.255.255.192 UG 0 0 0 tunl0 172.28.200.192 192.168.100.202 255.255.255.192 UG 0 0 0 tunl0 # /26, 62 个地址, 使用 tunl0 网卡(见下面 ip a) 确认了, 用完 62 个再给 62 个 172.28.231.192 0.0.0.0 255.255.255.192 U 0 0 0 * # 本机 172.28.231.193 0.0.0.0 255.255.255.255 UH 0 0 0 calia40f485afa6 172.28.231.194 0.0.0.0 255.255.255.255 UH 0 0 0 cali3729f748e9f 172.28.231.197 0.0.0.0 255.255.255.255 UH 0 0 0 cali1b12228b272 $ alias k='kubectl' $ k get pod -o wide --all-namespaces | grep 172 default qq-2048-3183590995-0jqlb 1/1 Running 0 3h 172.28.231.197 k8s-1 default qq-2048-3183590995-2w8wt 1/1 Running 0 3h 172.28.200.196 k8s-2 default qq-2048-3183590995-r8v41 1/1 Running 0 3h 172.28.13.69 k8s-3 default ww-2048-384147389-v50sr 1/1 Running 0 3h 172.28.13.70 k8s-3 kube-system kube-dns-4031778187-hkpxk 3/3 Running 0 10d 172.28.231.194 k8s-1 kube-system kube-dns-4031778187-z6n22 3/3 Running 0 10d 172.28.231.193 k8s-1 # 可以看到 calico 对 IP 池是做了划分的, 就是某台主机上的 podIP 使用的相同 /26 段内的 IP. $ ip a ... 34: tunl0@NONE: <NOARP,UP,LOWER_UP> mtu 1440 qdisc noqueue state UNKNOWN qlen 1 link/ipip 0.0.0.0 brd 0.0.0.0 inet 172.28.231.192/32 scope global tunl0 valid_lft forever preferred_lft forever # OK, 这个就是 ipip 的 tunl interface, 可以用 ip tunnel add testipip mode ipip remote 202.182.1.1 local 203.153.1.1 创建一个 POINTOPOINT 的 ipip link
非 IP-in-IP 模式下 1 2 3 4 5 6 7 8 9 10 11 12 13 14 15 16 17 18 19 20 21 $ route -n 172.28.13.64 192.168.100.203 255.255.255.192 UG 0 0 0 eth0 172.28.200.192 192.168.100.202 255.255.255.192 UG 0 0 0 eth0 172.28.231.192 0.0.0.0 255.255.255.192 U 0 0 0 * # 直接通过 eth0(本机网卡) 发送 $ k get pod -o wide --all-namespaces | grep 172 default qq-2048-3183590995-0jqlb 1/1 Running 0 3h 172.28.231.197 k8s-1 default qq-2048-3183590995-2w8wt 1/1 Running 0 3h 172.28.200.196 k8s-2 default qq-2048-3183590995-r8v41 1/1 Running 0 3h 172.28.13.69 k8s-3 default ww-2048-384147389-v50sr 1/1 Running 0 3h 172.28.13.70 k8s-3 kube-system kube-dns-4031778187-hkpxk 3/3 Running 0 10d 172.28.231.194 k8s-1 kube-system kube-dns-4031778187-z6n22 3/3 Running 0 10d 172.28.231.193 k8s-1 # 依旧是按照规划 /26 $ ip a 22: tunl0@NONE: <NOARP,UP,LOWER_UP> mtu 1440 qdisc noqueue state UNKNOWN qlen 1 link/ipip 0.0.0.0 brd 0.0.0.0 inet 172.28.200.192/32 scope global tunl0 valid_lft forever preferred_lft forever # 依旧会存在, 跨 subnet 的时候会用到, 比如我在集群中加入 10.x.y.z 网段的主机
性能测试 大约相差三分之一的性能, 启用 IP-in-IP, nload 可以看到在 tunl0 出现了流量, 帮你拆头.http://172.28.200.197/
另外 因为 IP-in-IP 模式, 会走 tunl0 这个 sub-interface, 会帮你再来个 20 byte 的 IP 头, 所以有时候会超限, 需要设置 MTU 减去 20.https://docs.projectcalico.org/v2.2/usage/configuration/mtu
BGP Calico 里剩下的都是 BGP 相关的内容了, 可以参考学习: 第三期(BGP专题)

